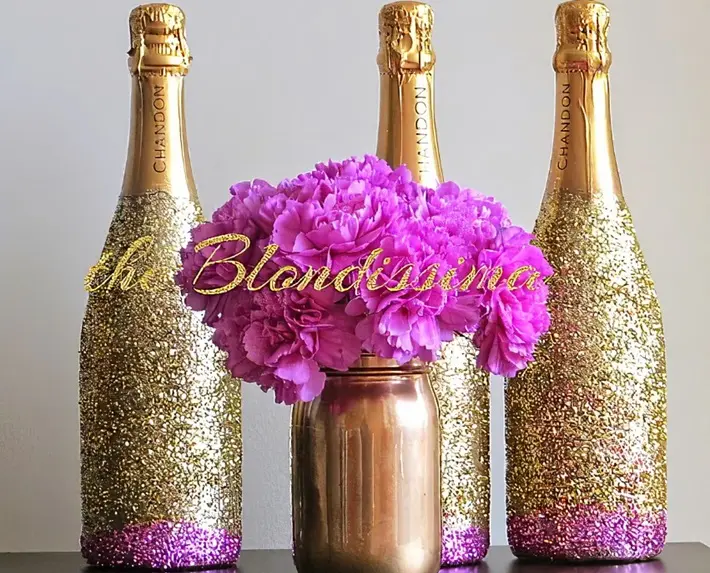
Creating glitter champagne bottles can add a touch of sparkle and glamour to any celebration. Whether you’re preparing for a wedding, birthday party, or any special occasion, glitter champagne bottles can elevate your decor and impress your guests. In this article, we’ll explore step-by-step how to make these dazzling creations using simple techniques that anyone can follow.
Glitter champagne bottles are not only visually stunning but also easy to customize to fit any theme or color scheme. They make excellent centerpieces, gifts, or simply eye-catching decorations for your event. By following a few straightforward steps and gathering the right materials, you can create your own glitter champagne bottles that will shine brightly at your next gathering.
Materials Needed
Before you begin, gather the following materials:
Champagne Bottles: Empty, clean bottles that can be glass or plastic.
Glitter: Fine or chunky glitter in your desired colors.
Mod Podge or Glue: A crafting glue that dries clear.
Paintbrushes: Small to medium-sized brushes for applying glue and glitter.
Masking Tape: To create clean lines and protect certain areas.
Sealant (Optional): A clear sealant to protect the glitter and prevent shedding.
Newspaper or Cardboard: To protect your workspace from glitter mess.
Decorative Ribbons or Labels (Optional): For additional embellishments.
See Also: What Does Dom Perignon Champagne Taste Like?
Step-by-Step Guide
Step 1: Prepare Your Workspace
Set up a clean and spacious workspace. Cover the area with newspaper or cardboard to catch any glitter and protect your surfaces. Ensure good ventilation if you are using sealants or sprays.
Step 2: Clean and Prepare the Bottles
Ensure that your champagne bottles are thoroughly cleaned and dried. Remove any labels or adhesive residue. If using glass bottles, make sure they are completely dry to avoid water marks.
Step 3: Apply Glue or Mod Podge
Using a paintbrush, apply a thin layer of Mod Podge or craft glue to the area of the bottle where you want the glitter to adhere. Work in small sections to prevent the glue from drying before you apply the glitter.
Step 4: Apply Glitter
Sprinkle the glitter evenly over the glued area. You can use a spoon or pour the glitter directly onto the bottle. Gently tap the bottle to shake off excess glitter. Repeat this process until the entire desired area is covered with glitter.
Step 5: Allow to Dry
Let the glittered area dry completely according to the glue or Mod Podge instructions. This typically takes about 1-2 hours, but drying times may vary depending on the humidity and thickness of the glue layer.
Step 6: Seal (Optional)
Once the glitter is dry, you may choose to apply a clear sealant over the glitter to protect it from shedding. Follow the manufacturer’s instructions for the sealant and allow it to dry completely before handling.
Step 7: Touch Up and Detailing
Inspect the bottle for any areas that may need touch-ups or additional glitter. Use a small brush to carefully apply glue to any bare spots and sprinkle with glitter as needed. Use masking tape to create clean lines if you want to create different sections of glitter or leave certain areas bare.
Step 8: Final Touches
Once your glitter champagne bottles are completely dry and sealed (if using sealant), you can add decorative ribbons, labels, or other embellishments to personalize them further. Allow any additional decorations to dry completely before handling.
Tips for Success
Choose the Right Glitter: Fine glitter gives a more subtle sparkle, while chunky glitter creates a bold effect.
Work in Small Sections: This helps to control the glue and glitter application and ensures even coverage.
Use Masking Tape: For clean lines and precise designs, especially if you’re creating patterns or leaving areas glitter-free.
Experiment with Colors: Mix different colors of glitter or use ombré techniques for a unique look.
Allow Ample Drying Time: Rushing the drying process can cause smudges or uneven glitter application.
Conclusion
Creating glitter champagne bottles is a fun and creative way to add a touch of elegance and excitement to any event. Whether you’re preparing for a wedding, birthday party, or simply want to spruce up your home decor, these sparkling bottles are sure to impress. By following the steps outlined in this guide and experimenting with different colors and techniques, you can create stunning glitter champagne bottles that will sparkle and shine throughout your celebration. Enjoy the process and let your creativity shine!


